I would just like too wish every body who had come on to my blog and those who just came in to read my blog a Very Happy and merry Christmas and happy holiday + a very happy New year ..
Merry Christmas
And A
Happy New Year.
Thanks for read , Paul ...
Saturday 22 December 2012
Monday 1 October 2012
Just a Little Update
Hi Just a little update
Sorry nothing to report realy since i took the boat out last excpt it been pritty bad over here for the weather so there hasn't been any thing done to the boat , Hoping to get the electrics sorted ASAP .
Because the GPS and the rest of the Nav-light, cabin and Deck light have to be put in also + i have got to get another fuel tank because when i took the boat out last time a almost ran out of fuel can't beleave how much fuel that Merc 1000 SS 100 HP drinks when you open it up .
Any Hooo i babbling on here , So as soon as any thing is done to the boat ill make shore there are photos and Vidio of what is being done
So bye for now. ....
Saturday 8 September 2012
Took the boat out for the second time
Hi every body
took the boat out again today i had to turn the engine a little as it wouldn't tic over properly, So before take the boat up the river i had a little tinker with the outboard and the took off for the day ..
took some photo and this time i took some footage with the Video so hope you like what i videoed i don't speak to much as i think i sound funny or it just me LOL .. so here's some video and some more photos ..


My Wesley Steering the boat,,

My Youngest posing for the camera again ..


My youngest again . We stopped here to wait for the locks to be come empty so that we could go in and carry on back down the river ...

just another view of the boat .

took the boat out again today i had to turn the engine a little as it wouldn't tic over properly, So before take the boat up the river i had a little tinker with the outboard and the took off for the day ..
took some photo and this time i took some footage with the Video so hope you like what i videoed i don't speak to much as i think i sound funny or it just me LOL .. so here's some video and some more photos ..


My Wesley Steering the boat,,

My Youngest posing for the camera again ..

a nice shoot of the Mercury 1000 SS 100 HP Tower of Power ..
Sorry but i can't seem to get the videos to upload , ill look into it and edit this post what i figger it out..
Figgered it out now ..
And here some more photos ..

My youngest again . We stopped here to wait for the locks to be come empty so that we could go in and carry on back down the river ...

just another view of the boat .

and a shoot of the bow with it's name on it now and just in case you can't read it it says ( MeSecond ) because i sold MeFirst ..
ok that's it for now when i get to finishing what i need to do inside the boat and the bits and peaces ill post a new lot of photo's and some video if i can get it load on here .. So bye for now ..
Wednesday 5 September 2012
Took the boat out for the first time
Hi all,
Took the boat out for the first time on Monday and for me i thought the boat floated lovely .
the out board needs a little turn up because it wont tick over on low Rev it cuts out, not good when you are trying to go though Lock and the gates , But other than that the Engine ran great and my God what power it has in it .
Once i got out of site and a nice straight bit of the river i opened the Engine up , before i knew it the nose was up and it was on it's plain and we were gone .
So here are some photo's of the Herwa in the water . I did get some video footage but i got my middle son to do it, But there isn't any thing in there whether keeping all he got was close up's of his face , his mate face and his little brothers face and other part that i wont mention , i might get my eldest son to come over to my place and get him to edit what bit are Editable if any and ill up load that instead .
So here the Photo's

The Herwa siting looking great.

The stern and the tower of Power the Mercury 1000 SS 100 HP.

My Younger .

My younger and Wesley's Friend Joe .

Wes , The Youngest and Joe .
So that it for now , If i can get any thing from the Video i will and then up loaded it
Buy for now ...
Friday 31 August 2012
Almost Finished off Boat Trailer
Hi ever one
Been working on the Trailer today the only thing is i got so in to welding that i for got to get any photos of what i was doing , But i will get some taken ASAP and up this post.
But any hooo back to the Subject what i have to do was finish the part of the trailer witch holds the bow in place, witch i had to fabricate From 60mm and 50mm Box Steel and a 1" steel tube, witch i had to heat up and bend into shape to fit the contours of the Bow .
I also made a couple of fixing brackets at the rear of the trailer out off some threaded screw bar heat and bent into a U shape and then welded into place.
Now i can secure the back of the boat when on the move.
All I've got to do now is the Mud guards the reason i couldn't do them is because the trailer is a twin axle and i purchased four individual mud guards to fix on, But because the two axles are a little to close the guards wont fit properly, so now i have got sell those and buy some double guards instead .
Well that's about it for now.
So as soon as i take the Pictures ill up date so you can see for your self's ....
Hi all, Here's the pictures of what has been done + what was done today as-well ..

This is the welding that was done before i took photo of it as it was be fabricated , better late than never ..


In these pic's all the fixtures and fitting are now being put on .


My son wes looking bizzy well trying to look it Lol, cleaning the windows .


in this one the Speedo tube and white thingy has been put on now + fenders .
see the two stainless steel U bolts on either side of the boat , i was reading other peoples Blogs and looking at the Pic's and videos that they had put on when i noticed that there boat had the same thing on there's but they have straps on there's to hold the boat in place to the trailer, which i thought was a very good idea so i had it done to mine as well ...

Wes still trying to look bizzy cleaning the windows ...


And here is the front end of the trailer all done and painted in galvanized under coat ready for painting in black paint ..


All new instrument clocks and fuse board witches.

And new upholstered seats and fresh Varnish in the cabin ..
Well that's it for the moment . Oh i forgot im gonna be putting it in the water hopefully on Monday for the first time in a long time. i will be taking photo's of it in the water and i might ever get my eldest s son Video camera and video it as well ..
Ok see ya for now ...
Monday 27 August 2012
Back from me holidays
Hi All back from me holidays now and hopefully get back to completing the boat and getting back into the
water for the first time few years that i've had it.
With in the Next couple of day im hoping to start the Outboard again mainly to get it a good run in as it hasn't been started for quite awhile and to sort out the tacometor or Rev counter in good old plain English LOL because when i did a little test with the outboard just before i went on me holidays it didn't to be working ,
Any how that about it for now keep popping in ans bye for now ...
Tuesday 31 July 2012
Up Date
I Started the Outboard today and ran it for a little while but because of where i have to keep it i couldn't run it for to long as i up set the Chickens on the Farm .
So as soon as i get back from my vacation ill get some pic's of the finished out side of the boat and with the engine running .
Thanks for those that have read though my Blog so far.
Paul ...
So as soon as i get back from my vacation ill get some pic's of the finished out side of the boat and with the engine running .
Thanks for those that have read though my Blog so far.
Paul ...
Thursday 14 June 2012
The Grimso Before i bought it
Hi my name Paul i bought this Boat around Two and a half years ago now '
When i got it the boat boat was in a very poor state as you can see in the photos. As i put the photos in i will describe what is going on in each of the photos.
So here's the first of the photos .
As you can see in these four Pictures is how the boat was advertised on ebay , the boat don't look very well do's it any i took a chance on it and bought it At not a very bad price either.


It's the one in front of that posh one I know i can only wish .
If you look at the Picture Number three you can see a whooping great cut out of it , What i gathered from the feller that i spoke to when i went to pick it up was the the person that had it brfore i did hit a very large object and put a hole in the keel on the Bow .
The hole was around 2" wide by about 3 / 3. 1/2" long so im guessing the boat took on water .
So what the twit did was cut that whooper of a hole in the Deck to get the water out, To be honest what i would have done was put the bow up on to some blocks the drilled a hole about a 1" in size and just left the boat to drain out and let the foam dry, but that's me.
Ok the next set of Photo's are when i get the Grimso back to my Friends farm.
 Here is when i got it off the Trailer, i put on tyers for the moment untill i made some supports for the Keel to sit on.
 This shoot of the Starboard side.
 The Port side.
 Oh and my two youngest wanted to get in the shoot also LOL, and you can just see the wife climbing bot of the boat after spending an hour cleaning all that muck out.
The start of Restoration.
Right Lets get started on the Restoration .
I started by clean out the rest of the old foam that was left behind by the last owner , For any body that has had to do this is not easy i can tell ya .
Sorry about the photo's these were taken by my phone.

 After getting all the foam out i thought i would reinforce the Keel, because all that was in here was foam
so i thought while there's a big hole here let make the keel stronger so i did.
 the first two picture show where i was starting to fiber glass the 1"/1" pine wooden lengths in even distances in the hole.

 Once i finished Glassing the timbers i cut out spacers from marine ply and screwed them into place with stainless steel screws.
 in these two pictures you can see the timber covered in fiber glass.

 My youngest giving me a hand well more like getting in the way LOL.

Putting in the foam.
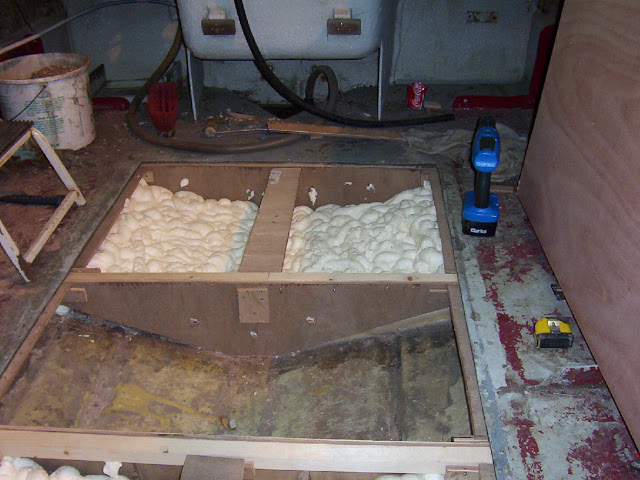 Here i've put some of the ply around the edges so that the new floor or deck has got some support and have something to fix it to.
 putting in new foam as well as putting more marine ply in the middle to give the centre a lot more support.
i waited until the foam was almost to the top of the hole before putting the Deck in place and screwing it down until the foam set.

 And here's with the new deck down and in place , what a great filling that was when i get that done.
oh i almost forgot to tell you about the hole in the keel at the front of the boat, after cleaning the area i fiber glassed the hole using mat and woven glass fiber and the on the keel it self on the out side i finished it off with Gel coat and rubbed it down until it was smooth as a pain of glass .
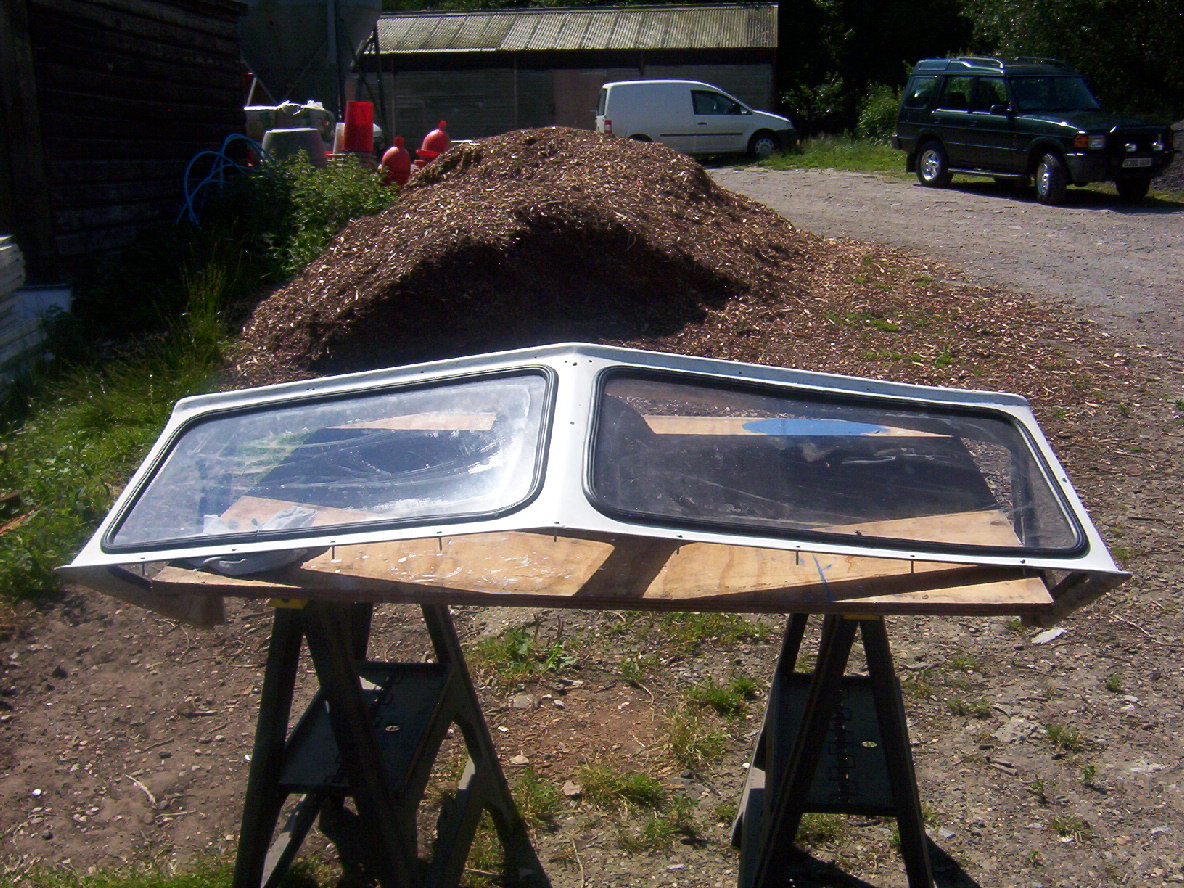
Putting a Bulk head.
After along discussion with the wife we both decided to put a bulk head to make the cabin an enclosed rather than an open cabin. unfortunately i didn't take any photo's of the first build when i put in the timbers to make a studded wall or bulk head before putting the marine ply onto it , so the pictures below show the first few layers of fiber glass drying off before i put the next layer on.


On the picture above you can see were i mark out were the cabin door was going to be and the cut it out before i fiber glass the bulk head. The Gel coat should cover any remaining marker lines. ( I Hope LOL. )
The Second layer of fiber glass mating.
The second later of fiber glass mating went on with out a glitch and dried off very nicely indeed
.jpg)

 What i doing in these two photo's is sanding down fill that i put onto the to of the bulk head or the V shaped
Top so that i got a very smooth service so that when i spray on the gel coat it wouldn't have any lumps and bumps in it.

After Spraying on the Gel Coat
This is the Hull now after i sprayed the Gel coat on the top and sides of the boat and the wife rolled the blue Gel coat on the keel.
The port side.
 The Starboard side.

I well get round to tell you how i sprayed the Gel coat on Rather than rolling or brushing it on.
Sorry i haven't put any more on yet because over here in the UK we'er having to swim every were we go, we've had that much rain ...
If it rains any more im gonna need the boat sooner than rather than later when it's done LOL ..
Hi again you may have noticed the rain had at last stopped for the moment and let the sun get out by the photos ..
For those in the know im sorry for this next bit But for those that don't here's some good advise what spraying Gel-coat ..
Weather you Spray / Roller or Brush the Gel-coat, If the Gel-coat is not in a vacuum ie No oxygen can get to the Gel it will NOT go off hard it stays Soft and tacky, Its dry just not hard.
Witch is what i found out the hard way when i Sprayed my boat in the Pic's above. the Gel just didn't harden it was dry but just stayed tacky and Soft ..
So in the Picture below you will see the Before and After the Gel-coat is put on the Wright way ...
You may have noticed the boat is no longer in a barn it's because my friend that owned the farm that my boat was stored on sold up and moved on. so now the boat is now stored at another friends farm so if you see chickens running around you'll know what sort of farm it is LOL ..
Any how the boat has Sat for quite a long time sibce i Gel-coated it in the last photos you have seen about a year in Total, so the Gel is in a bad way. The dirt has ground it's self in the Gel and the sun has also done a lot of damage as well like making the Gel go like orange pile in places. So in these photos ya gonna see where me and my son has had to sand it back with Wet and Dry sand paper ..
 if you look close enough you can see a little shin on the stern of the boat.

 in this photo you can see the difference in the clean and the dirty.
 here's my 13 Yr old Wesley cleaning the starboard side of the boat with a scotch cloth and working very hard may i say.
 you can still see the dirt on the bow in this pic.

 In these two pic's of the stern have been clean plus you can now see what out board engine i have to move this puppy. The out board my be an oldie but it has still got loads of power left in it and run like a dream..

Here is a close up so that you can see how much dirt is in the Gel .

And a little closer look at the Mercury 1000 SS 100 HP Out board ...

So ill will soon put on more photos where i have resprayed the Gel coat properly this time on the boat and tell you what i should have done in the first place....
Hi Again
Sorry i haven't any photo's of the boat when i was spraying the Flowcoat on , as like Gelcoat you don't get a lot of time to get what you need to get done ...
So if you want to spray the flowcoat on then you will need to buy spay-able GelCoat and then add 2% wax in styrene thats 2% wax to weight of Gelcoat. By doing this it will allow the Gelcoat to harden and go off properly.
What the wax do's , is because the wax will not bind with the Gelcoat the wax want's to separate from the Gel and what it do's is floats to the top and that's what makes a seal and allows the Gel to go hard ...
So in the next Photo's you will see hopefully the difference between the before and after, The thing is as do, people that have sprayed flowcoat of any kind will know is when you spray flowcoat when it drys it go like the best way to describe it is , it go's like orange pile , So once it's been left for a day or two you can rub it down by using wet and dry rubbing down paper starting from what i used was a 320 grit right thought until i got to the 2000 grit paper.
And i can tell you that it was as smooth as a baby's well you know , So after using the rubbing down paper i then used a rubbing down compound starting from a raped cut to a medium and then fine cut and that made the boat shine just with that but to give it the gleam i used a Auto Glym wax and did that do the job ...
 Here to can see my youngest starting to take off the masking tape and paper after the Flowcoat has hardened.

 Now he's just posing for the Camera .
 The Starboard side
 And of cause the port side
 I think in these next three photo's you can see the boat looks much brighter than i the other shoots of it.

 the outboard all masked up to keep it clean
 This is the Splash over top masked up and has bean sprayed


 and if you look at these photo's you'll be able to see the after it's bean sprayed and a before, the about is the sprayed and the blow if the be fores ..


Well thats as far as i have got at the moment and as soon as the weather becomes sunny again ill get some more photo's of it all polished up and bake together again ...
When i got it the boat boat was in a very poor state as you can see in the photos. As i put the photos in i will describe what is going on in each of the photos.
So here's the first of the photos .
As you can see in these four Pictures is how the boat was advertised on ebay , the boat don't look very well do's it any i took a chance on it and bought it At not a very bad price either.


It's the one in front of that posh one I know i can only wish .
If you look at the Picture Number three you can see a whooping great cut out of it , What i gathered from the feller that i spoke to when i went to pick it up was the the person that had it brfore i did hit a very large object and put a hole in the keel on the Bow .
The hole was around 2" wide by about 3 / 3. 1/2" long so im guessing the boat took on water .
So what the twit did was cut that whooper of a hole in the Deck to get the water out, To be honest what i would have done was put the bow up on to some blocks the drilled a hole about a 1" in size and just left the boat to drain out and let the foam dry, but that's me.
Ok the next set of Photo's are when i get the Grimso back to my Friends farm.


The start of Restoration.
Right Lets get started on the Restoration .
I started by clean out the rest of the old foam that was left behind by the last owner , For any body that has had to do this is not easy i can tell ya .
Sorry about the photo's these were taken by my phone.


so i thought while there's a big hole here let make the keel stronger so i did.


Putting in the foam.


i waited until the foam was almost to the top of the hole before putting the Deck in place and screwing it down until the foam set.


oh i almost forgot to tell you about the hole in the keel at the front of the boat, after cleaning the area i fiber glassed the hole using mat and woven glass fiber and the on the keel it self on the out side i finished it off with Gel coat and rubbed it down until it was smooth as a pain of glass .
Putting a Bulk head.
After along discussion with the wife we both decided to put a bulk head to make the cabin an enclosed rather than an open cabin. unfortunately i didn't take any photo's of the first build when i put in the timbers to make a studded wall or bulk head before putting the marine ply onto it , so the pictures below show the first few layers of fiber glass drying off before i put the next layer on.


On the picture above you can see were i mark out were the cabin door was going to be and the cut it out before i fiber glass the bulk head. The Gel coat should cover any remaining marker lines. ( I Hope LOL. )
The Second layer of fiber glass mating.
The second later of fiber glass mating went on with out a glitch and dried off very nicely indeed
.jpg)


Top so that i got a very smooth service so that when i spray on the gel coat it wouldn't have any lumps and bumps in it.

After Spraying on the Gel Coat
This is the Hull now after i sprayed the Gel coat on the top and sides of the boat and the wife rolled the blue Gel coat on the keel.
The port side.


I well get round to tell you how i sprayed the Gel coat on Rather than rolling or brushing it on.
Sorry i haven't put any more on yet because over here in the UK we'er having to swim every were we go, we've had that much rain ...
If it rains any more im gonna need the boat sooner than rather than later when it's done LOL ..
Hi again you may have noticed the rain had at last stopped for the moment and let the sun get out by the photos ..
For those in the know im sorry for this next bit But for those that don't here's some good advise what spraying Gel-coat ..
Weather you Spray / Roller or Brush the Gel-coat, If the Gel-coat is not in a vacuum ie No oxygen can get to the Gel it will NOT go off hard it stays Soft and tacky, Its dry just not hard.
Witch is what i found out the hard way when i Sprayed my boat in the Pic's above. the Gel just didn't harden it was dry but just stayed tacky and Soft ..
So in the Picture below you will see the Before and After the Gel-coat is put on the Wright way ...
You may have noticed the boat is no longer in a barn it's because my friend that owned the farm that my boat was stored on sold up and moved on. so now the boat is now stored at another friends farm so if you see chickens running around you'll know what sort of farm it is LOL ..
Any how the boat has Sat for quite a long time sibce i Gel-coated it in the last photos you have seen about a year in Total, so the Gel is in a bad way. The dirt has ground it's self in the Gel and the sun has also done a lot of damage as well like making the Gel go like orange pile in places. So in these photos ya gonna see where me and my son has had to sand it back with Wet and Dry sand paper ..


Here is a close up so that you can see how much dirt is in the Gel .

And a little closer look at the Mercury 1000 SS 100 HP Out board ...

So ill will soon put on more photos where i have resprayed the Gel coat properly this time on the boat and tell you what i should have done in the first place....
Hi Again
Sorry i haven't any photo's of the boat when i was spraying the Flowcoat on , as like Gelcoat you don't get a lot of time to get what you need to get done ...
So if you want to spray the flowcoat on then you will need to buy spay-able GelCoat and then add 2% wax in styrene thats 2% wax to weight of Gelcoat. By doing this it will allow the Gelcoat to harden and go off properly.
What the wax do's , is because the wax will not bind with the Gelcoat the wax want's to separate from the Gel and what it do's is floats to the top and that's what makes a seal and allows the Gel to go hard ...
So in the next Photo's you will see hopefully the difference between the before and after, The thing is as do, people that have sprayed flowcoat of any kind will know is when you spray flowcoat when it drys it go like the best way to describe it is , it go's like orange pile , So once it's been left for a day or two you can rub it down by using wet and dry rubbing down paper starting from what i used was a 320 grit right thought until i got to the 2000 grit paper.
And i can tell you that it was as smooth as a baby's well you know , So after using the rubbing down paper i then used a rubbing down compound starting from a raped cut to a medium and then fine cut and that made the boat shine just with that but to give it the gleam i used a Auto Glym wax and did that do the job ...


Well thats as far as i have got at the moment and as soon as the weather becomes sunny again ill get some more photo's of it all polished up and bake together again ...
Subscribe to:
Posts (Atom)